The Oven Fan Element — The Secret to Even Cooking Every Time
If your oven isn’t cooking evenly, or you notice hot and cold spots in your bakes and roasts, the problem could be your oven fan element.
This small but crucial component circulates hot air inside the oven, ensuring consistent temperatures for perfectly cooked meals. A faulty fan element can lead to uneven cooking, longer cooking times, and wasted energy.
The good news? Replacing an oven fan element is something you can do yourself if you follow the right steps. Here’s a clear guide to help you through the process safely and effectively.
⚡ Safety First
Before you start:
- Disconnect your oven from the power supply — unplug it or switch off the breaker.
- Wear gloves — the inside of an oven can have sharp metal edges.
- Don’t attempt repairs if unsure — call a qualified technician.
Safety is the most important step, so never skip it.
🧰 Tools and Materials You’ll Need
- Replacement oven fan element
- Screwdriver
- Pliers
- Wire strippers
- Electrical tape
Having these ready will make the replacement process smooth and straightforward.
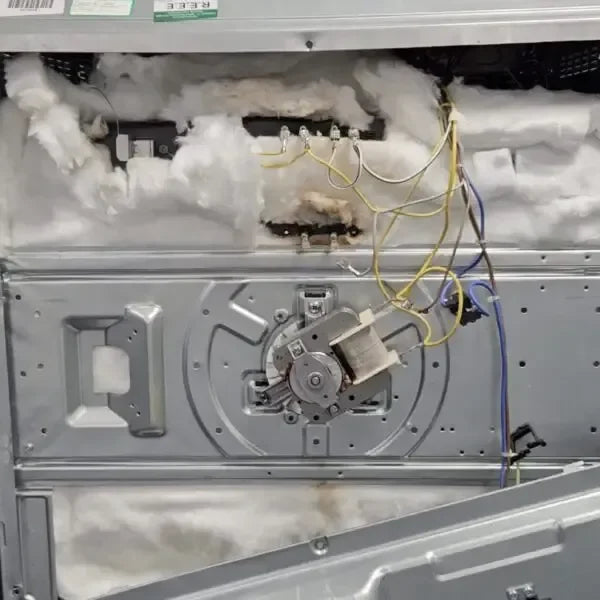
🛠 Step 1: Locate the Fan Element
- The fan element is usually at the back of the oven, behind a metal cover.
- Some ovens place it at the top or bottom, so check your oven’s user manual if you’re unsure.
🛠 Step 2: Remove the Fan Element Cover
- Use a screwdriver to remove the screws holding the cover in place.
- Carefully pull the cover away, taking care not to damage any wires or connections.
💡 Tip: Keep the screws in a small container so you don’t lose them.
🛠 Step 3: Disconnect the Fan Element
- You’ll see two wires connected to the fan element.
- Use pliers to gently pull them off.
- Take note of which wire goes where — a photo or labels can save you confusion later.
🛠 Step 4: Remove the Old Fan Element
- Check for screws holding the element in place and remove them.
- Carefully pull the element out of the oven.
- If it feels stuck, gently wiggle it until it comes free.
🛠 Step 5: Install the New Fan Element
- Place the new fan element in the exact position as the old one.
- Screw it in securely using the screws you removed earlier.
🛠 Step 6: Reconnect the Wires
- Reattach the wires exactly as they were on the old element.
- Use wire strippers to expose a small amount of wire if needed.
- Secure the connections with electrical tape for safety.
💡 Tip: Double-check your wiring before moving on — mistakes can damage the oven or the new element.
🛠 Step 7: Replace the Fan Element Cover
- Put the cover back over the fan element and screw it into place.
- Make sure it sits flush and all screws are tightened.
🛠 Step 8: Test the Oven
- Restore power to the oven.
- Turn it on and check that:
- The fan is spinning
- Hot air is circulating evenly
If everything works, congratulations! You’ve successfully replaced your oven fan element.
💡 Quick Tips for Longevity
- Avoid banging pans against the oven walls — it can damage the fan element over time.
- Keep the oven clean to prevent build-up around the fan.
- Always use the correct replacement part for your oven model.
